| Flaw Detector | Fruit Hardness tester | Rockwell hardness tester | Force gauge | Thickness gauge |
[News] Force Gauge
[Notice] Rockwell Hardness tester
[Event] New Hardness tester on li
[News] We have become the member
[News] UFD610 Ultrasonic Flaw de
[Promote] Fruit Hardness Tester
[News] Force Gauge
[Notice] Rockwell Hardness tester
[Event] New Hardness tester on li
[News] We have become the member
[News] UFD610 Ultrasonic Flaw de
[Promote] Fruit Hardness Tester
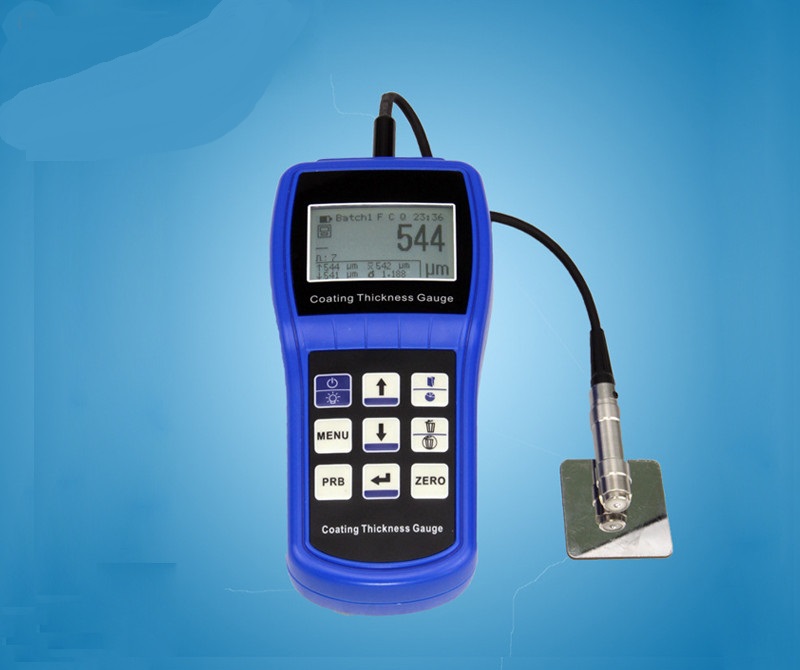
[Specifications]:
Using magnetic and eddy current two thickness method.
The unique temperature compensation algorithm;
Features:
1, using magnetic and eddy current two thickness method can measure the thickness of the magnetic metal matrix on the non-magnetic coating, can be measured non-magnetic metal matrix on the thickness of the non-conductive coating;
2, split (connection between the sensor and the lead instrument), dual (F-type N-type one);
3, the unique temperature compensation algorithm;
4, with two measurements: continuous measurement mode (CONTINUE) and a single measurement (SINGLE);
5, with statistical functions: average value (Here MEAN), maximum value (the MAX), minimum value (the MIN), the number of tests (NO.), Standard deviation (S.DEV);
6, with storage function: can store 500 measurement values;
Applications:
Widely used in metal processing, chemical, commodity inspection, electroplating, painting, pipeline corrosion, aluminum, steel and other industries, but also for shipbuilding, aerospace, power, pot special inspection, Technical Supervision and other industries.
Specifications::
|
Probe Type |
F |
N |
|
|
Working principle |
Magnetic induction |
vortex |
|
|
Measuring range |
0~1250μm |
0~1250μm【Chrome-plated copper(0~40μm)】 |
|
|
Resolution |
0.1μm(0~50μm ),1μm(>50μm ) |
||
|
Measurement error |
3%H+1μm(H measurement range)See Table a |
||
|
Indication error |
Point calibration(um) |
±(3%H+1) |
±(3%H+1.5) |
|
Two-point calibration(μm) |
±[(1~3)%H+1] |
±[(1~3)%H+1.5] |
|
|
Test Conditions |
min radius of curvature(mm) |
凸 1.5 |
凸3 |
|
diameter of the smallest area(mm) |
Φ7 |
Φ5 |
|
|
Minimum substrate thickness(mm) |
0.5 |
0.3 |
|
|
Operating Voltage |
3×1.5V AAA Alkaline battery |
||
|
Dimensions |
155mm×68mm×27 mm |
||
|
Instrument Weight |
230g |
||
Standard configuration:
|
name |
number |
name |
number |
|
main engine |
1 |
Iron matrix |
1 |
|
aluminum matrix |
1 |
Specimen |
5 |
|
battery |
2 |
Instructions |
1 |
|
Warranty Card |
1 |
Certificate |
1 |
|
Packing List |
1 |
Instructions |
1 |
Optional probe parameters:
|
Probe Model |
F400 |
F1 |
F1/90 |
F10 |
N1 |
CN02 |
|
|
working principle |
Magnetic induction |
Electric Eddy currents |
|||||
|
Measuring range(μm) |
0-400 |
0-1250 |
0-10000 |
0-1250 |
10-200 |
||
|
Resolution(μm) |
0.1 |
0.1 |
10 |
0.1 |
1 |
||
|
Indication error |
Point calibration(μm) |
±(3%H+1) |
±(3%H+10) |
±(3%H+1.5) |
±(3%H+1) |
||
|
Two-point calibration (μm) |
±[(1-3)%H+0.7] |
±[(1-3)%H+1] |
±[(1-3)%H+10] |
±[(1-3)%H+1.5] |
— |
||
|
Test Conditions
|
min radius of curvature(mm) |
凸1 |
凸1.5 |
Straight |
10 |
3 |
Straight |
|
diameter of the smallest area(mm) |
Φ3 |
Φ7 |
Φ7 |
Φ40 |
Φ5 |
Φ7 |
|
|
Minimum substrate thickness(mm) |
0.2 |
0.5 |
0.5 |
2 |
0.3 |
Unlimited |
|
| Force Gauge | Rockwell Hardness Tester | Roughness Tester | Thickness Gauge | Flaw Detector | Webster Barcol | Hardness Tester | Vibration Tester |

Adress:1602 Lingdi,Beiyuan Lu, Chaoyang District,100012 Beijing
E-mail:sales@lanetechworld.com angelajade@126.com
Tel:+86-10-84956391
Hot-Line:+86-10-84956391


